Simple Valentine's Day Manicure

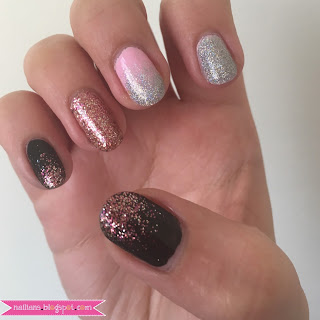
Valentine’s Day is tomorrow so it’s only right to post a last minute manicure that anyone can do. There’s no nail art tools or accessories needed, just two glitter polishes and 2 solid color nail polishes.
Simple Valentines day manicure

Nail art instructions:
  1. Start off with a base coat 
  2. Paint your thumb and pinky black and the rest light pink
  3. For your ombré glitter nails (my thumb, middle and pinky finger) start off with one thin coat of glitter. This will cover about half your nail. When it dries do a second coat but don’t go as far down. Finally do a third coat at the tip of your nail.
  4. For your glitter nails (my pointer and ring finger) paint 3 coats of glitter nail polish making sure they dry in between.
  5. 👽Make sure you end every manicure with a fast drying top coat👽

I really hope you enjoy tomorrow and embrace your loved ones 💕But most importantly love yourself! It’s okay to sit in the house and eat pizza all night, that’s the best date you could ever ask for.

Products I used :
Essence the gel nail polish “sweet an candy” Click here to buy
Sinful colors “Black on Black” Click here to buy
Sally Hansen dries instantly top coat Click here to buy
LuxePop Electrix “White Base Coat” Sold exclusively at Walgreens
NYC “Pink bling” Click here to buy
Revlon “holographic pearls” Click here to buy
Comments

Post a Comment

★ Most Viewed

Let's have some fun with "French Nails"🙂

Many of you probably love getting French Nails done. Did you know that you can try many different styles? Here are some samples I painted to show you. (Without using any tape or tools)            1) Plain french      2) Wider french      3) Even-triangle french      4) Uneven-triangle french      5) Straight-line french You can be creative   :) < Product Used > O.P.I. Nail Lacquer "MALAGA WINE" : Sold at any grocery stores / O.P.I. stores HEMA Special Effect "HOLOGRAPHIC" : Sold exclusively at HEMA (Store in Europe) Additionally, Using 'Nail stickers' or 'Rhinestones' will make your nails shine even MORE!! :)

From Dull to Bold

Have you ever picked a bright nail polish that turned out dull and dark? Well I have a solution for you! It’s very simple and it only adds one step to your nail process.  After adding your base coat apply one coat of white nail polish before your chosen color. My pointer finger has a white coat under my polish and my middle finger does not. On my thumb I have a split view to see the drastic change. Isn’t it crazy?!?! Products used: ​ LuxePop Electrix “White Base Coat” Sold exclusively at Walgreens LuxePop Electrix “Coral Volt” Sold exclusively at Walgreens Sally Hansen “Dries Instantly Top Coat”  Click here to buy SuperNail Cuticle Oil  Click here to buy

'Ping Pong' Nails

What's your favorite color to paint your nails? No need to use only one color, just pick as many as you want! Let's mix them up.- "Ping Pong Nails" Of course, it is pretty as it is. Yellow, Pink, Blue, Green, or even Black... Any color! -'Yellow' one color nails- Bright yellow makes you feel fresh and cute. -'Pink' one color nails- Pink is always loved by many ladies :) Let's mix them up now. There is no certain way to do this, you can try so many different coordinations We can mix them up in so many creative ways. -Yellow and Holographic silver mixed- It is always fun to have a point color(silver) with the main color(yellow) mixed. - Pink and Glitter silver mixed - This time, Pink is the main color and Glitter silver is the point color. Or the other way around :)